
Self-host K3s on Hetzner Cloud with Terraform: Under $25/month Production Kubernetes

Self-host K3s on Hetzner Cloud with Terraform: Under $25/month Production Kubernetes
Managed Kubernetes costs 5-10x what raw compute costs. You’re paying for someone else to run kubectl for you.
After pricing out a basic cluster on AWS and GKE—a few private services, a couple public endpoints, nothing exotic—the estimates landed north of $200/month before traffic costs. That moved managed Kubernetes out of my budget immediately. So I built the stack myself on Hetzner Cloud. Here’s the exact setup.
This guide gets you a production-ready K8s cluster on Hetzner Cloud for under $25/month. You’ll own every layer—compute, networking, storage, ingress. Spin up a private music server, self-hosted cloud storage, a side project API—whatever you want, whenever you want, no permission required. No vendor lock-in. No surprise bills.
Difficult Easy – Time to deploy ~20 minutes
Init
What You Need
# Install everything via Homebrew (MacOS/Linux/WSL)
brew install terraform kubectl k9s hcloud packer coreutils
Hetzner Cloud account — Login/Sign-up here
Terminal fluency — You live here now
20 minutes — That’s it
The ZipOps newsletter publishes the next articles in this series: TLS automation, observability stack, and deploying real applications. No spam, just infrastructure guides for developers who'd rather own their stack.
Get Your API Key
Hetzner needs to trust your Terraform commands. Create a project in Hetzner Cloud Console, go to Security > API Tokens, generate a token with Read & Write permissions.

This key is root access to your cloud. Treat it like a password.
Build Base Images
Hetzner spins up nodes from snapshots. This script creates them—a temporary VM builds the OS image, then self-destructs. Takes ~6 minutes. Costs pennies.
Bash cli
tmp_script=$(mktemp) && \
curl -sSL -o "${tmp_script}" https://raw.githubusercontent.com/kube-hetzner/terraform-hcloud-kube-hetzner/master/scripts/create.sh && \
chmod +x "${tmp_script}" && \
"${tmp_script}" && \
rm "${tmp_script}"
Fish cli
set tmp_script (mktemp) && \
curl -sSL -o "$tmp_script" https://raw.githubusercontent.com/kube-hetzner/terraform-hcloud-kube-hetzner/master/scripts/create.sh;
chmod +x "$tmp_script" && \
bash "$tmp_script" && \
rm "$tmp_script"
Expected output
==> Builds finished. The artifacts of successful builds are:
--> hcloud.microos-x86-snapshot: 'OpenSUSE MicroOS x86 by Kube-Hetzner' (ID: *********)
--> hcloud.microos-arm-snapshot: 'OpenSUSE MicroOS ARM by Kube-Hetzner' (ID: *********)
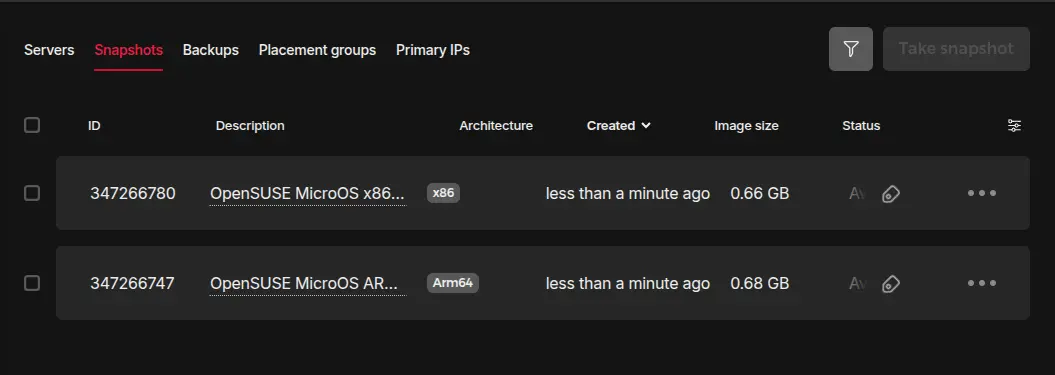
Sometimes selected VM tier are not available anymore, or it's not available in predefined cluster location. After the process completed, double check Server --> Snapshot and make sure you have exactly 2 images:
- OpenSUSE MicroOS x86 by Kube-Hetzner
- OpenSUSE MicroOS ARM by Kube-Hetzner
If something is missing, update kube.tf as well as hcloud-microos-snapshots.pkr.hcl updating location and/or server_type with actually valid values and run the same script again.
If process completed successfully and you have both snapshots in your project, safe delete temporary files
rm hcloud-microos-snapshots.pkr.hcl kube.tf
Generate SSH Keys
You need password-less SSH access to your nodes. This is your backdoor when things break. Do not lose this key
# Press Enter twice (no passphrase)
mkdir -p cred/terra && \
ssh-keygen -t ed25519 -f cred/terra/hetzner-key -C "your-email@example.com"
Lose this key and you lose SSH access to your nodes. I've seen teams locked out of production because someone ran rm -rf in the wrong directory. Store it in a password manager. Back it up encrypted. This is your break-glass access.
Your file tree now looks like this
project-folder/
└── cred/
    └── terra/
        ├── hetzner-key        # Private. Never share. Don't lose.
        └── hetzner-key.pub    # Public. Goes to Hetzner.
Apply
Define Your Cluster
This is where you decide: how many nodes, what size, which datacenter. The kube.tf file IS your infrastructure. Version control it.
Control Plane Nodes — Run the API server, scheduler, and etcd (cluster state database). Lose etcd without backups = lose your cluster. Run 3 for production HA, 1 is fine for dev & budget projects.
Worker Nodes — Run your application pods. Scale these horizontally. One dying shouldn't cripple you.
Cilium — Replaces kube-proxy with eBPF. Faster networking, built-in ingress, egress control. This config is production-ready.
Longhorn — Distributed storage. Pods request volumes, Longhorn replicates across nodes. Node dies, data survives in volumes.

Create kube.tf in your project root
# === INPUT VARIABLES ===
locals {
  cluster_ipv4_cidr = "10.42.0.0/16"
}

variable "hcloud_token" {
  description = "Hetzner Cloud API token"
  sensitive = true
}
variable "cluster_name" { default = "prod-cluster" }
variable "server_location" { default = "fsn1" }    # Falkenstein, Germany
variable "control_node_type" { default = "cx23" }  # 2 vCPU, 4GB RAM, ~$5/mo
variable "worker_node_type" { default = "cx33" }   # 4 vCPU, 8GB RAM, ~$15/mo
variable "control_node_count" { default = 1 }
variable "worker_node_count" { default = 1 }

# === OUTPUTS ===
output "kubeconfig" {
  value     = module.kube-hetzner.kubeconfig
  sensitive = true
}

data "hcloud_floating_ips" "all" {
  depends_on = [module.kube-hetzner]
}

output "floating_ip" {
  description = "Your public IP—point DNS here"
  value       = data.hcloud_floating_ips.all.floating_ips[0].ip_address
}

# === PROVIDER ===
provider "hcloud" {
  token = var.hcloud_token
}

terraform {
  required_version = ">= 1.5.0"
  required_providers {
    hcloud = {
      source  = "hetznercloud/hcloud"
      version = ">= 1.51.0"
    }
  }
}

# === CLUSTER ===
module "kube-hetzner" {
  providers    = { hcloud = hcloud }
  hcloud_token = var.hcloud_token
  source       = "kube-hetzner/kube-hetzner/hcloud"

  ssh_public_key  = file("./cred/terra/hetzner-key.pub")
  ssh_private_key = file("./cred/terra/hetzner-key")

  # Control plane: the brain
  control_plane_nodepools = [
    {
      name        = "control-plane",
      server_type = var.control_node_type,
      location    = var.server_location,
      labels      = [],
      taints      = [],
      count       = var.control_node_count,
    }
  ]

  # Workers: the muscle
  agent_nodepools = [
    {
      name                 = "worker",
      server_type          = var.worker_node_type,
      location             = var.server_location,
      labels               = [],
      taints               = [],
      count                = var.worker_node_count,
      floating_ip          = true,
      longhorn_volume_size = 100
    }
  ]

  # Storage: Longhorn for persistent volumes
  enable_longhorn = true
  longhorn_fstype = "ext4"

  # Security: encrypted etcd
  k3s_exec_server_args = "--secrets-encryption"

  # No Hetzner LB—we use Cilium
  load_balancer_type     = ""
  load_balancer_location = ""

  # Cluster settings
  enable_klipper_metal_lb           = "false"
  allow_scheduling_on_control_plane = false
  automatically_upgrade_os          = false
  automatically_upgrade_k3s         = false
  cluster_name                      = var.cluster_name
  use_cluster_name_in_node_name     = false

  # Networking: Cilium with eBPF
  cni_plugin                    = "cilium"
  disable_kube_proxy            = true
  disable_network_policy        = true
  cilium_hubble_enabled         = true
  enable_cert_manager           = true
  cilium_routing_mode           = "native"
  cluster_ipv4_cidr             = local.cluster_ipv4_cidr
  cilium_egress_gateway_enabled = true
  ingress_controller            = "none"

  cilium_values = <<EOT
MTU: 1450
k8sServiceHost: 127.0.0.1
k8sServicePort: "6444"
kubeProxyReplacement: true
routingMode: native
ipv4NativeRoutingCIDR: "10.0.0.0/8"
auto-direct-node-routes: true
endpointRoutes:
  enabled: true
ipam:
  mode: kubernetes
  operator:
    clusterPoolIPv4PodCIDRList:
    - 10.42.0.0/16
ingressController:
  enabled: true
  default: true
  loadbalancerMode: shared
  externalTrafficPolicy: Local
bpf:
  masquerade: true
  lbExternalClusterIP: true
EOT

  # Firewall: explicit allow only
   # Hetzner firewall configuration
  extra_firewall_rules = [

    # SSH
    {
      description     = "Allow Outbound TCP Ssh Communication"
      destination_ips = [
        "0.0.0.0/0",
        "::/0",
      ]
      source_ips      = []
      direction       = "out"
      port            = "22"
      protocol        = "tcp"
    },

    # Nodeport range
    {
      description     = "Allow Inbound NodePort Range"
      source_ips = [
        "0.0.0.0/0",
        "::/0",
      ]
      destination_ips = []
      direction       = "in"
      port            = "30000-32767"
      protocol        = "tcp"
    },

    # HTTP/HTTPS
    {
      description     = "Allow Inbound HTTP Communication"
      source_ips = [
        "0.0.0.0/0",
        "::/0",
      ]
      destination_ips = []
      direction       = "in"
      port            = "80"
      protocol        = "tcp"
    },
    {
      description     = "Allow Outbound HTTP Communication"
      destination_ips = [
        "0.0.0.0/0",
        "::/0",
      ]
      source_ips      = []
      direction       = "out"
      port            = "80"
      protocol        = "tcp"
    },
    {
      description     = "Allow Inbound HTTPS Communication"
      source_ips = [
        "0.0.0.0/0",
        "::/0",
      ]
      destination_ips = []
      direction       = "in"
      port            = "443"
      protocol        = "tcp"
    },
    {
      description     = "Allow Outbound HTTPS Communication"
      destination_ips = [
        "0.0.0.0/0",
        "::/0",
      ]
      source_ips      = []
      direction       = "out"
      port            = "443"
      protocol        = "tcp"
    },
    {
      description     = "Allow Inbound HTTPS Communication for API"
      source_ips = [
        "0.0.0.0/0",
        "::/0",
      ]
      destination_ips = []
      direction       = "in"
      port            = "9090"
      protocol        = "tcp"
    },
    {
      description     = "Allow Outbound HTTPS Communication for API"
      destination_ips = [
        "0.0.0.0/0",
        "::/0",
      ]
      source_ips      = []
      direction       = "out"
      port            = "9090"
      protocol        = "tcp"
    },

    # DNS
    {
      description     = "Allow Outbound DNS Communication"
      destination_ips = [
        "0.0.0.0/0",
        "::/0",
      ]
      source_ips      = []
      direction       = "out"
      port            = "53"
      protocol        = "udp"
    },
    {
      description     = "Allow Outbound DNS over TCP Communication"
      destination_ips = [
        "0.0.0.0/0",
        "::/0",
      ]
      source_ips      = []
      direction       = "out"
      port            = "53"
      protocol        = "tcp"
    },

    # In claster TCP/UDP
    {
      description = "Allow all TCP between cluster nodes"
      destination_ips = []
      source_ips  = ["10.42.0.0/16"]
      direction   = "in"
      port        = "1-65535"
      protocol    = "tcp"
    },
    {
      description = "Allow all UDP between cluster nodes"
      destination_ips = []
      source_ips  = ["10.42.0.0/16"]
      direction   = "in"
      port        = "1-65535"
      protocol    = "udp"
    },

    # Ping rules
    # keep during first installation
    {
      description = "Allow all ICMP"
      destination_ips = []
      source_ips  = ["0.0.0.0/0"]
      direction   = "in"
      port        = ""
      protocol    = "icmp"
    },
    {
      description = "Allow all ICMP"
      destination_ips = ["0.0.0.0/0"]
      source_ips  = []
      direction   = "out"
      port        = ""
      protocol    = "icmp"
    },
  ]
}
This config isn't arbitrary. kubeProxyReplacement: true eliminates iptables overhead—measurable latency improvement under load. routingMode: native with ipv4NativeRoutingCIDR avoids VXLAN encapsulation between nodes. The ingressController block replaces Traefik (k3s default) with Cilium's eBPF-based ingress. I burned a month debugging packet drops before landing on this combination.
Same rule apply as before: sometimes tier are not available anymore or not available in a given location. Eventually update row 8 to 10 for cluster location, control panel tier and worker node tier, then apply again.
K8s will handle any broken installation on its own.
Set Your API Token
Never hardcode secrets. Export the token, so Terraform can read it without storing it in files.
# bash
export TF_VAR_hcloud_token="your-api-token-here"

# fish
set -xg TF_VAR_hcloud_token "your-api-token-here"
Deploy
One command. Terraform reads your config, diffs against reality, and creates what’s missing.
terraform init && terraform apply
Review the plan. Type yes to confirm. Watch your cluster materialize.
Plan: 36 to add, 0 to change, 0 to destroy.
Do you want to perform these actions?
  Enter a value: yes
~8 minutes later
Apply complete! Resources: 36 added, 0 changed, 0 destroyed.

Outputs:
kubeconfig = <sensitive>
floating_ip = "X.X.X.X"
Note your floating IP
This is your internet door, you have to use it in ingress/gateway as well as in DNS setup.
If you eventually miss it, just extract it again from Terraform
terraform output floating_ip
Real-World Application
Connect to Your Cluster
kubectl needs credentials. Extract them from Terraform output.
mkdir -p cred/kubectl && \
terraform output -raw kubeconfig > cred/kubectl/kubeconfig
Define path variable for kubeconfig
bash
export KUBECONFIG="$(pwd)/cred/kubectl/kubeconfig"
fish
set -xg KUBECONFIG "$(pwd)/cred/kubectl/kubeconfig"
Verify you’re connected
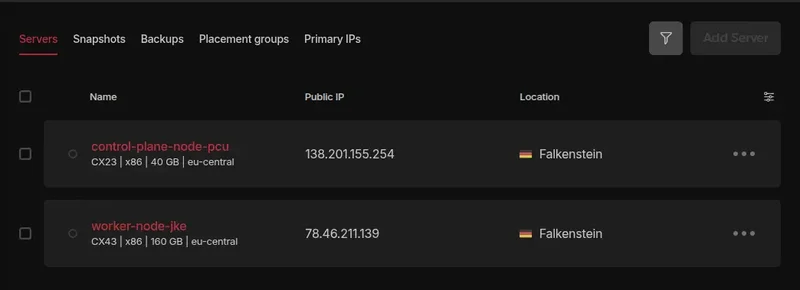
kubectl get nodes
You should see your control plane and worker nodes in Ready state
NAME                STATUS   ROLES                       AGE     VERSION
control-plane-qeb   Ready    control-plane,etcd,master   5m45s   v1.31.14+k3s1
worker-rqk          Ready    <none>                      5m11s   v1.31.14+k3s1
You just provisioned infrastructure that takes most teams a sprint to configure. ZipOps runs this exact stack—Hetzner, Cilium, Longhorn—but you deploy with a simple ./zipops instead of terraform apply. If you need this done quick: see what we're building
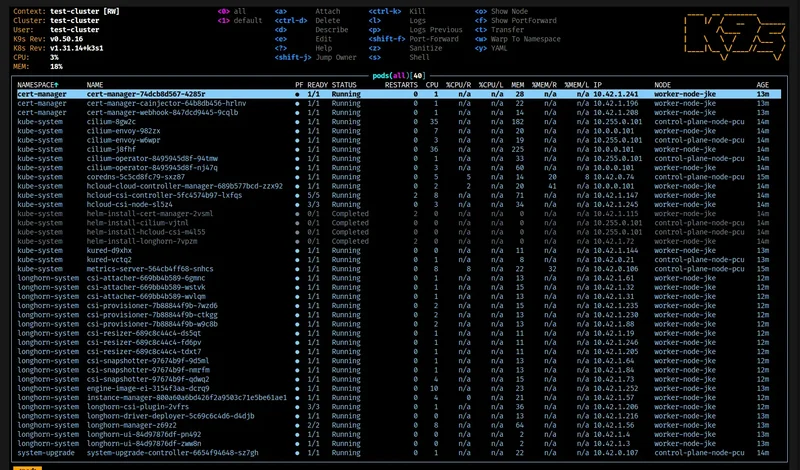
Explore with K9s
Raw kubectl works. K9s is faster. It’s a terminal UI that lets you navigate resources in real-time.
k9s
Type :pods to see running pods. :services for services. :nodes for node status. This is your K8s IDE.
Deploy Your First App
Theory is worthless without proof. Let’s put nginx on your cluster and hit it from a browser.
For each of this file create it, fill it, and apply it through kubectl -f resource.yaml
Tell Cilium About Your IP
Cilium’s ingress controller needs to know which IPs it can use. You have one floating IP. Tell it.
ip-pool.yaml
apiVersion: "cilium.io/v2alpha1"
kind: CiliumLoadBalancerIPPool
metadata:
  name: gateway-ip-pool
spec:
  allowFirstLastIPs: "Yes"
  blocks:
  - cidr: "YOUR_FLOATING_IP/32"  # <-- your value here
Create a Namespace
Define proper namespace for a testing service. Use it for all resources.
namespace.yaml
apiVersion: v1
kind: Namespace
metadata:
  name: test
Define the Deployment
Deployments manage pods. They restart crashed containers, handle rolling updates, and scale replicas. You declare what you want; K8s makes it happen.
deployment.yaml
apiVersion: apps/v1
kind: Deployment
metadata:
  name: nginx-hello-world
  namespace: test
spec:
  replicas: 1
  selector:
    matchLabels:
      app: nginx-hello-world
  template:
    metadata:
      labels:
        app: nginx-hello-world
    spec:
      containers:
      - name: nginx
        image: nginx:alpine
        ports:
        - containerPort: 80
        resources:
          requests:
            memory: "64Mi"
            cpu: "50m"
          limits:
            memory: "128Mi"
            cpu: "100m"
Expose It Internally
Services give pods a stable address. Pod IPs change on restart; service IPs don’t. Internal routing goes through services.
service.yaml
apiVersion: v1
kind: Service
metadata:
  name: nginx-hello-world
  namespace: test
spec:
  type: ClusterIP
  selector:
    app: nginx-hello-world
  ports:
  - port: 80
    targetPort: 80
Route External Traffic
Ingress connects the outside world to your service. This rule says: any HTTP request to / goes to nginx-hello-world.
ingress.yaml
apiVersion: networking.k8s.io/v1
kind: Ingress
metadata:
  name: nginx-ingress
  namespace: test
spec:
  rules:
  - http:
      paths:
      - path: /
        pathType: Prefix
        backend:
          service:
            name: nginx-hello-world
            port:
              number: 80
TL;DR — One File, One Command
Skip the individual files. Here’s everything combined. Replace YOUR_FLOATING_IP.
hello-world.yaml
apiVersion: v1
kind: Namespace
metadata:
  name: test
---
apiVersion: apps/v1
kind: Deployment
metadata:
  name: nginx-hello-world
  namespace: test
spec:
  replicas: 1
  selector:
    matchLabels:
      app: nginx-hello-world
  template:
    metadata:
      labels:
        app: nginx-hello-world
    spec:
      containers:
      - name: nginx
        image: nginx:alpine
        ports:
        - containerPort: 80
        resources:
          requests: { memory: "64Mi", cpu: "50m" }
          limits: { memory: "128Mi", cpu: "100m" }
---
apiVersion: v1
kind: Service
metadata:
  name: nginx-hello-world
  namespace: test
spec:
  type: ClusterIP
  selector:
    app: nginx-hello-world
  ports:
  - port: 80
    targetPort: 80
---
apiVersion: networking.k8s.io/v1
kind: Ingress
metadata:
  name: nginx-ingress
  namespace: test
spec:
  rules:
  - http:
      paths:
      - path: /
        pathType: Prefix
        backend:
          service:
            name: nginx-hello-world
            port:
              number: 80
---
apiVersion: "cilium.io/v2alpha1"
kind: CiliumLoadBalancerIPPool
metadata:
  name: gateway-ip-pool
spec:
  allowFirstLastIPs: "Yes"
  blocks:
  - cidr: "YOUR_FLOATING_IP/32"  # <-- your value here
Verify
Open your browser. Navigate to http://YOUR_FLOATING_IP. You should see nginx’s welcome page.
That’s your stack working end-to-end: Internet → Floating IP → Cilium Ingress → Service → Pod → Container and back

What This Costs
Let’s make a quick comparison from what you build in Hetzner VS the price for the same resources on EKS AWS from Amazon—and where ZipOps fits in.
Component | Hetzner (this guide) | AWS EKS | ZipOps |
|---|---|---|---|
Control Node | $5 | $73 | $5 |
Worker Node | $15 | $60 | $15 |
Load Balancer | $0 | $20 | $0 |
Floating IP | $5 | $4 | $5 |
100GB Storage | $6 | $0 | $6 |
1TB Transfer | $0 (up to 20TB) | $60 | $0 (up to 20TB) |
Monthly Total | $25 + your time | $230+ | $25+ + one time pay |
You Manage | Everything | Less, but vendor lock-in | Everything |
ZipOps sits in the middle: Hetzner pricing, managed convenience + one time payment. Same Cilium networking, same Longhorn storage and a lot more—we just handle all the hard setup. Your call whether the time savings justify the delta.
The Part Nobody Tells You
Your cluster works. Congratulations—you’re now the SRE.
That means:
Security patches: MicroOS auto-updates help, but you own Cilium and Longhorn versions
Backup verification: Longhorn snapshots are worthless if you’ve never tested a restore
Incident response: Node goes down at 3 AM? That’s your phone buzzing
Capacity planning: Watch memory pressure before your pods get OOMKilled during traffic spikes
This isn’t fear-mongering—it’s the job description. If you’re here to learn Kubernetes, this is the right path. If you’re here to ship product, consider whether infrastructure is where you want to spend your cycles.
ZipOps newsletter covers both paths: self-hosting guides for the wolves, and managed options for teams that’d rather hunt than build dens.
What’s Next
Your cluster runs. Now make it production-ready.
Setup domain with TLS — Install cert-manager, get free Let’s Encrypt certificates
Set up monitoring — The
grafana-prometheus-lokistack are a no-brain choiceBack up etcd — Setup Longhorn to create fresh back-up daily. Do this before you need it.
Deploy something real— Your app, your SaaS, your idea
The Point
The cloud is someone else’s computer. Managed K8s is someone else’s kubectl—charging you an easy 10x for the privilege.
You now own your infrastructure. Scale it. Break it. Fix it. Every problem you solve is knowledge no vendor can revoke.
Your keys. Your cluster. Your responsibility.