
How to Build an AI Code Reviewer That Teaches Instead of Fixing

How to Build an AI Code Reviewer That Teaches Instead of Fixing
Most AI code tools want to autocomplete your student’s homework. That’s the opposite of teaching. I built a workflow that takes a GitHub repository, runs it through an LLM with structured evaluation prompts, and returns scored feedback on naming, structure, logic, and completeness — with line-by-line suggestions that ask questions instead of handing out answers. The whole thing runs on N8N, costs almost nothing, and takes about an afternoon to set up.
If you teach programming, or review code from junior devs, and you’re tired of writing the same “rename this variable” comment for the 400th time, this is for you.
Init
What You Need
Before diving in, ensure you have:
access to an N8N account
a well-crafted N8N workflow
JSON/Markdown renderer system (GitHub repository is an ok solution)
Once you have an n8n account, you can simply download the workflow JSON from the link, upload it to your n8n instance, and tweak it as needed. If you'd like to understand the process or need a step-by-step guide, we dive deeper into the details in this article.
N8N

N8N is a workflow automation platform — think Zapier, but with actual code nodes and a visual editor that doesn’t make you want to close your laptop. You chain together triggers, logic blocks, HTTP calls, and AI model integrations into a single executable pipeline.
What makes it particularly useful here is the bridge between structured code logic and LLM interaction. You can write JavaScript to sanitize data, call the GitHub API, build prompts dynamically, then hand everything to an AI node — all inside the same workflow. The visual canvas also makes it easy to debug: you click a node and see exactly what data passed through it.
The framework supports code in JS as well as Python, but if you don’t need a special Python library, JS is definitely easier to install. It can do everything we need, so this guide will be focused on JS only.
The Cheapest Way
N8N’s cloud starter tier sits around
But if you want to self-host and skip the subscription entirely, you can run N8N on your own server or on simple localhost for free. The only cost becomes the LLM tokens themselves. I’m building ZipOps partly for setups like this — lightweight self-hosted tooling without the cloud bill.
JSON/Markdown Renderer

The workflow outputs structured data — either JSON or Markdown — so you need something to render it into a readable format. There are a few practical options depending on your setup, and I’ll show examples of each later in this article:
HTML/JS web page rendering JSON directly. This is the most flexible approach — you build a small page that reads the JSON and displays scores, suggestions, and file-level feedback in a proper UI. Standard web stack, full control over layout.
Obsidian rendering Markdown. If you already use Obsidian for notes, you can paste the Markdown output directly into a vault and get a clean, navigable review document. Share it through a GitHub repo and students can read it anywhere.
Discord rendering Markdown. Copy-paste the output into a Discord channel and it renders natively. Useful for quick feedback loops — especially if your class already has a server (most of your students probably use Discord, anyway).

Each approach has tradeoffs. JSON gives you programmatic control but needs a renderer. Markdown is instantly readable but harder to build dynamic interfaces around.
N8N Workflow Framework
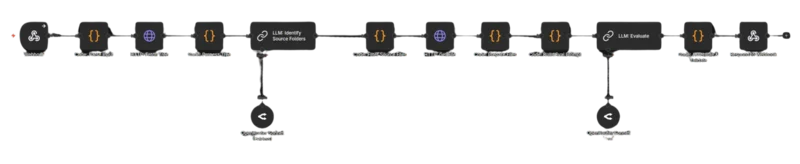
The full workflow follows three stages. First, you define how the process starts — either a manual trigger for testing or a webhook for production use. Second, you define the actual analysis pipeline: fetch the repo, identify source files, build prompts, run the evaluation. Third, you decide how to package the output — JSON for structured rendering, Markdown for quick sharing.
Each stage has its own set of nodes in N8N, and I’ll break them all down below.
Init Strategy
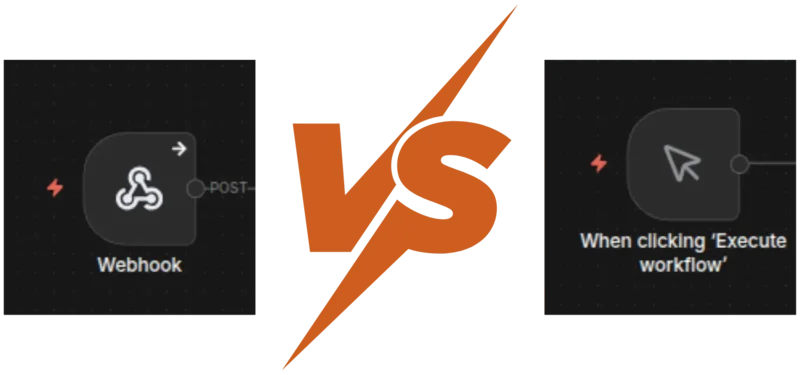
You have two main options for kicking off the workflow
Manual trigger is the simpler setup. You define your input — repo URL, optional exercise description — directly in a JavaScript code node. It’s great for testing and iteration because you can tweak inputs without leaving the N8N editor. The downside is maintenance: every time you want to analyze a different repo, you’re editing code.
If you have a list of repo from a class, you can just tweak the code and create an array of repo URL. Workflow will treats each item of the array as a single call data-flow, so you're basically piping all repos from an entire class in a single workflow. At the end you can collect all the result in any supported way (more later in the article).
Webhook is faster in practice. You expose an endpoint, POST a JSON body with the repo URL, and the workflow fires automatically. But the initial setup takes more work — you need to either build an input form, write a curl command, or wire up a front-end. Once it’s running though, it’s the obvious choice for anything beyond personal use.
Keep in mind everything could stay in localhost for a domestic use. You can share the process with your colleagues, but for the students who reading the Markdown output will be good enough.
The Output

Same kind of trade-off on the output side
Markdown is ready to use immediately. Paste it into Obsidian, push it to a GitHub repo, drop it in a Discord channel — it renders everywhere. The limitation is portability across custom interfaces. If you want to build a proper grading dashboard later, you’ll end up parsing the Markdown back into structured data, which is painful.
JSON requires more upfront work. You need an HTML/JS page (or any front-end) that can ingest the data and render it. But once you have that, sharing becomes a link instead of a file. And the structured format means you can sort by score, filter by metric, or aggregate across students without any text parsing.
The Actual Workflow
Here’s where the real magic happens: The inner pipeline breaks down into three phases
Repository breakdown handles the grunt work: sanitize the input data, fetch the repo’s file tree from GitHub, then run a quick LLM pass to figure out which folders actually contain student-written source code. This step filters out node_modules, build artifacts, config files, and framework boilerplate before the expensive evaluation even starts.
Evaluation is the core. Download the target files, add line numbers, validate the total size (you don’t want a surprise $40 token bill, especially for a broken test reading 90MB of node_modules file), and submit everything alongside a carefully structured prompt. The prompt defines exact scoring rubrics, enforces teaching-oriented feedback, and demands JSON output.
Packing the result takes the LLM response, validates and sanitizes the JSON, computes an overall score, enriches it with metadata, and sends it back through the web-hook response. Clean data in, clean data out.
Step by Step Breakdown
1. Parse Input
The first node validates the incoming webhook body, extracts the repoUrl and optional exerciseDescription, then parses the GitHub owner and repository name from the URL. Simple string manipulation — but it catches malformed URLs early before anything else runs.
const body = $input.first().json.body;

const repoUrl = body.repoUrl;
if (!repoUrl) throw new Error('Missing required field: repoUrl');

const exerciseDescription = body.exerciseDescription || '';

// Parse owner/repo from GitHub URL
const urlParts = repoUrl.replace(/\.git$/, '').replace(/\/$/, '').split('/');
const repo = urlParts.pop();
const owner = urlParts.pop();
if (!owner || !repo) throw new Error(`Cannot parse owner/repo from URL: ${repoUrl}`);

return [{ json: { owner, repo, repoUrl, assignmentPrompt: exerciseDescription } }];
2. Select Target Files
2a. Fetch Tree
GitHub’s Git Trees API returns every file and folder in a repository as a flat list — paths, types, sizes. Instead of cloning the entire repo or hitting the Contents API file by file, a single tree request gives you the full picture. We use it to build a map of the project before downloading anything.
2b. Process Tree
Once we have the tree, we extract all file paths and build a prompt that asks the LLM to identify which folders contain actual student-written source code. The goal is tree shaking — filtering out dependencies, build outputs, and boilerplate so the evaluation only looks at code the student actually wrote.
The prompt is deliberately constrained: return a JSON array of folder paths, nothing else
Given this project file tree, identify which folders contain actual source code
written by a student. Exclude dependencies, build output, config files, test
fixtures, and framework boilerplate.
Return ONLY a JSON array of folder paths to analyze.

Example: ["src/main", "app/components"]
If all source files are in the root, return ["."]

File tree:
{treeText}
The code node builds this prompt dynamically from the fetched tree and passes it to the next LLM call:
const parseUrl = $('Code: Parse Input').first().json;
const treeResp = $input.first().json;

const branch = treeResp.url?.includes('/main?') ? 'main' : 'master';

const filePaths = treeResp.tree
  .filter(item => item.type === 'blob')
  .map(item => item.path);

if (filePaths.length === 0) throw new Error('No files found in repository');

const treeText = filePaths.join('\n');

return [{
  json: {
    owner: parseUrl.owner,
    repo: parseUrl.repo,
    branch,
    repoUrl: parseUrl.repoUrl,
    assignmentPrompt: parseUrl.assignmentPrompt,
    treeText,
    filePaths,
    folderDetectionPrompt: `Given this project file tree, identify which folders contain actual source code written by a student. Exclude dependencies, build output, config files, test fixtures, and framework boilerplate.\nReturn ONLY a JSON array of folder paths to analyze.\n\nExample: ["src/main", "app/components"]\nIf all source files are in the root, return ["."]\n\nFile tree:\n${treeText}`
  }
}];
2c. Identify Source
This LLM call has one job: look at the file tree and return the folders worth evaluating. The system prompt locks it into a strict “project structure analyzer” role, and the output format is constrained to a raw JSON array — no markdown fences, no explanation.
You are a project structure analyzer. Given a file tree, identify folders containing student-written source code. Return ONLY a valid JSON array of folder path strings. No explanation, no markdown fences.
The output — something like ["src", "lib/utils"] — feeds directly into the next node, which filters the full file list down to just the files inside those folders.
3. Fetch Files
3a. Filter Source Files
The filter node takes the LLM’s folder list and cross-references it against every file path from the tree. Only files inside identified source folders survive. There’s a fallback built in: if the LLM response is malformed or unparseable, it defaults to ["."] — which means “everything in the root.” Better to evaluate too much than silently skip the whole repo.
In N8N you can eventually define fallback workflow that run in case of error. You can instruct it to report the error instead of just missing the response.
If zero files match after filtering, the workflow short-circuits with a NO_SOURCE_FILES error instead of burning tokens on an empty evaluation.
const prev = $('Code: Process Tree').first().json;
const folderResp = $('LLM: Identify Source Folders').first().json;

let sourceFolders = ['.'];
try {
  let folderText = folderResp.text || folderResp.response || JSON.stringify(folderResp);
  folderText = folderText.replace(/```json\n?/g, '').replace(/```/g, '').trim();
  sourceFolders = JSON.parse(folderText);
  if (!Array.isArray(sourceFolders)) sourceFolders = ['.'];
} catch (e) {
  sourceFolders = ['.'];
}

const isInSourceFolder = (path) => {
  if (sourceFolders.includes('.')) return true;
  return sourceFolders.some(f => path.startsWith(f + '/') || path === f);
};

const sourceFiles = prev.filePaths.filter(path => isInSourceFolder(path));

if (sourceFiles.length === 0)
  return [{
    json: {
      error: true,
      code: 'NO_SOURCE_FILES',
      message: 'No source files found in the identified source folders.'
    }
  }];

return sourceFiles.map(filePath => ({
  json: {
    owner: prev.owner,
    repo: prev.repo,
    branch: prev.branch,
    repoUrl: prev.repoUrl,
    assignmentPrompt: prev.assignmentPrompt,
    sourceFolders,
    filePath
  }
}));
3b. Get Files
Each filtered file gets downloaded individually via the GitHub Contents API. The node makes one HTTP GET per file, using the owner, repo, branch, and file path extracted earlier. N8N handles the parallel execution — each item from the filter step becomes its own request.
3c. Prepare Files
This is the safety valve. The node collects every downloaded file, prepends line numbers (used later for precise feedback references), detects the dominant language, and — critically — counts total lines across all files.
If the project exceeds 3,000 lines, the workflow stops with a PROJECT_TOO_LARGE error. This matters more than you’d think. When you’re automating calls to a third-party LLM that bills by token count, an unbounded input is a blank check. One student submitting a framework-generated project with 50,000 lines of scaffolding would cost more than your entire monthly budget. Always validate input size when you’re paying per token.
const items = $input.all();
const meta = $('Code: Filter Source Files').first().json;

if (meta.error) return [{ json: meta }];

const files = [];
for (let i = 0; i < items.length; i++) {
  const data = items[i].json;
  const filterItems = $('Code: Filter Source Files').all();
  const filePath = filterItems[i]?.json?.filePath || '';

  const content = typeof data === 'string' ? data : (data.data || data.body || '');
  if (!content) continue;

  const lines = content.split('\n');
  const ext = filePath.split('.').pop().toLowerCase();
  const numbered = lines.map((line, idx) =>
    `[${String(idx + 1).padStart(3, '0')}] ${line}`
  ).join('\n');

  files.push({
    filename: filePath,
    language: ext,
    totalLines: lines.length,
    numberedContent: numbered
  });
}

if (files.length === 0)
  return [{
    json: {
      error: true,
      code: 'NO_SOURCE_FILES',
      message: 'Could not fetch any source files from the repository.'
    }
  }];

const totalLines = files.reduce((sum, f) => sum + f.totalLines, 0);

if (totalLines > 3000)
  return [{
    json: {
      error: true,
      code: 'PROJECT_TOO_LARGE',
      message: `Project has ${totalLines} lines (max 3000). Reduce the project size.`
    }
  }];

const langCounts = {};
files.forEach(f => { langCounts[f.language] = (langCounts[f.language] || 0) + f.totalLines; });
const dominantLanguage = Object.entries(langCounts).sort((a, b) => b[1] - a[1])[0][0];

return [{
  json: {
    totalLines,
    language: dominantLanguage,
    fileCount: files.length,
    files,
    owner: meta.owner,
    repo: meta.repo,
    branch: meta.branch,
    repoUrl: meta.repoUrl,
    assignmentPrompt: meta.assignmentPrompt
  }
}];
4. Evaluate
4a. Build Prompt
This node assembles the final evaluation prompt from moving parts. The core is always 3 metrics — naming, structure, and logic. But when the teacher provides an exercise description, a 4th metric (completeness) activates automatically. The code from the previous section handles the conditional logic, building assignmentContext and completenessMetric blocks only when exerciseDescription is present.