
How to Build an AI Code Reviewer That Teaches Instead of Fixing

How to Build an AI Code Reviewer That Teaches Instead of Fixing
Most AI code tools want to autocomplete your student’s homework. That’s the opposite of teaching. I built a workflow that takes a GitHub repository, runs it through an LLM with structured evaluation prompts, and returns scored feedback on naming, structure, logic, and completeness — with line-by-line suggestions that ask questions instead of handing out answers. The whole thing runs on N8N, costs almost nothing, and takes about an afternoon to set up.
If you teach programming, or review code from junior devs, and you’re tired of writing the same “rename this variable” comment for the 400th time, this is for you.
Init
What You Need
Before diving in, ensure you have:
access to an N8N account
a well-crafted N8N workflow
JSON/Markdown renderer system (GitHub repository is an ok solution)
Once you have an n8n account, you can simply download the workflow JSON from the link, upload it to your n8n instance, and tweak it as needed. If you'd like to understand the process or need a step-by-step guide, we dive deeper into the details in this article.
N8N

N8N is a workflow automation platform — think Zapier, but with actual code nodes and a visual editor that doesn’t make you want to close your laptop. You chain together triggers, logic blocks, HTTP calls, and AI model integrations into a single executable pipeline.
What makes it particularly useful here is the bridge between structured code logic and LLM interaction. You can write JavaScript to sanitize data, call the GitHub API, build prompts dynamically, then hand everything to an AI node — all inside the same workflow. The visual canvas also makes it easy to debug: you click a node and see exactly what data passed through it.
The framework supports code in JS as well as Python, but if you don’t need a special Python library, JS is definitely easier to install. It can do everything we need, so this guide will be focused on JS only.
The Cheapest Way
N8N’s cloud starter tier sits around
But if you want to self-host and skip the subscription entirely, you can run N8N on your own server or on simple localhost for free. The only cost becomes the LLM tokens themselves. I’m building ZipOps partly for setups like this — lightweight self-hosted tooling without the cloud bill.
JSON/Markdown Renderer

The workflow outputs structured data — either JSON or Markdown — so you need something to render it into a readable format. There are a few practical options depending on your setup, and I’ll show examples of each later in this article:
HTML/JS web page rendering JSON directly. This is the most flexible approach — you build a small page that reads the JSON and displays scores, suggestions, and file-level feedback in a proper UI. Standard web stack, full control over layout.
Obsidian rendering Markdown. If you already use Obsidian for notes, you can paste the Markdown output directly into a vault and get a clean, navigable review document. Share it through a GitHub repo and students can read it anywhere.
Discord rendering Markdown. Copy-paste the output into a Discord channel and it renders natively. Useful for quick feedback loops — especially if your class already has a server (most of your students probably use Discord, anyway).

Each approach has tradeoffs. JSON gives you programmatic control but needs a renderer. Markdown is instantly readable but harder to build dynamic interfaces around.
N8N Workflow Framework
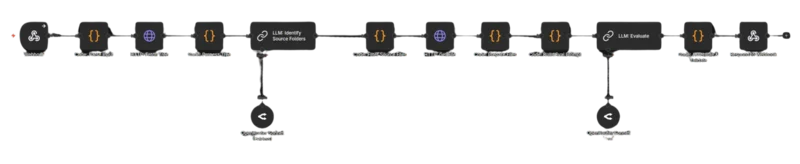
The full workflow follows three stages. First, you define how the process starts — either a manual trigger for testing or a webhook for production use. Second, you define the actual analysis pipeline: fetch the repo, identify source files, build prompts, run the evaluation. Third, you decide how to package the output — JSON for structured rendering, Markdown for quick sharing.
Each stage has its own set of nodes in N8N, and I’ll break them all down below.
Init Strategy
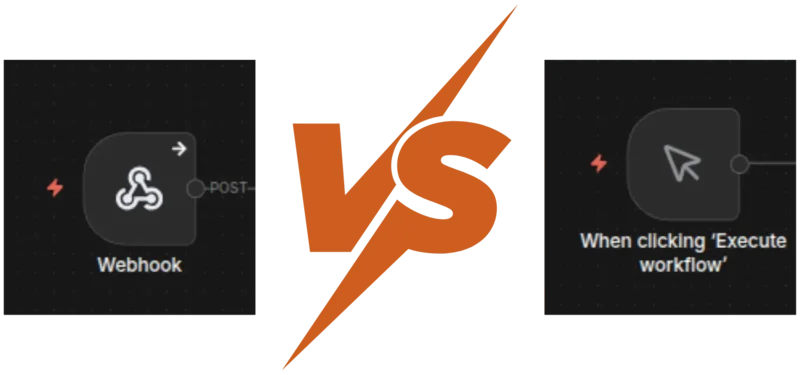
You have two main options for kicking off the workflow
Manual trigger is the simpler setup. You define your input — repo URL, optional exercise description — directly in a JavaScript code node. It’s great for testing and iteration because you can tweak inputs without leaving the N8N editor. The downside is maintenance: every time you want to analyze a different repo, you’re editing code.
If you have a list of repo from a class, you can just tweak the code and create an array of repo URL. Workflow will treats each item of the array as a single call data-flow, so you're basically piping all repos from an entire class in a single workflow. At the end you can collect all the result in any supported way (more later in the article).
Webhook is faster in practice. You expose an endpoint, POST a JSON body with the repo URL, and the workflow fires automatically. But the initial setup takes more work — you need to either build an input form, write a curl command, or wire up a front-end. Once it’s running though, it’s the obvious choice for anything beyond personal use.
Keep in mind everything could stay in localhost for a domestic use. You can share the process with your colleagues, but for the students who reading the Markdown output will be good enough.
The Output

Same kind of trade-off on the output side
Markdown is ready to use immediately. Paste it into Obsidian, push it to a GitHub repo, drop it in a Discord channel — it renders everywhere. The limitation is portability across custom interfaces. If you want to build a proper grading dashboard later, you’ll end up parsing the Markdown back into structured data, which is painful.
JSON requires more upfront work. You need an HTML/JS page (or any front-end) that can ingest the data and render it. But once you have that, sharing becomes a link instead of a file. And the structured format means you can sort by score, filter by metric, or aggregate across students without any text parsing.
The Actual Workflow
Here’s where the real magic happens: The inner pipeline breaks down into three phases
Repository breakdown handles the grunt work: sanitize the input data, fetch the repo’s file tree from GitHub, then run a quick LLM pass to figure out which folders actually contain student-written source code. This step filters out node_modules, build artifacts, config files, and framework boilerplate before the expensive evaluation even starts.
Evaluation is the core. Download the target files, add line numbers, validate the total size (you don’t want a surprise $40 token bill, especially for a broken test reading 90MB of node_modules file), and submit everything alongside a carefully structured prompt. The prompt defines exact scoring rubrics, enforces teaching-oriented feedback, and demands JSON output.
Packing the result takes the LLM response, validates and sanitizes the JSON, computes an overall score, enriches it with metadata, and sends it back through the web-hook response. Clean data in, clean data out.
Step by Step Breakdown
1. Parse Input
The first node validates the incoming webhook body, extracts the repoUrl and optional exerciseDescription, then parses the GitHub owner and repository name from the URL. Simple string manipulation — but it catches malformed URLs early before anything else runs.
const body = $input.first().json.body;

const repoUrl = body.repoUrl;
if (!repoUrl) throw new Error('Missing required field: repoUrl');

const exerciseDescription = body.exerciseDescription || '';

// Parse owner/repo from GitHub URL
const urlParts = repoUrl.replace(/\.git$/, '').replace(/\/$/, '').split('/');
const repo = urlParts.pop();
const owner = urlParts.pop();
if (!owner || !repo) throw new Error(`Cannot parse owner/repo from URL: ${repoUrl}`);

return [{ json: { owner, repo, repoUrl, assignmentPrompt: exerciseDescription } }];
2. Select Target Files
2a. Fetch Tree
GitHub’s Git Trees API returns every file and folder in a repository as a flat list — paths, types, sizes. Instead of cloning the entire repo or hitting the Contents API file by file, a single tree request gives you the full picture. We use it to build a map of the project before downloading anything.
2b. Process Tree
Once we have the tree, we extract all file paths and build a prompt that asks the LLM to identify which folders contain actual student-written source code. The goal is tree shaking — filtering out dependencies, build outputs, and boilerplate so the evaluation only looks at code the student actually wrote.
The prompt is deliberately constrained: return a JSON array of folder paths, nothing else
Given this project file tree, identify which folders contain actual source code
written by a student. Exclude dependencies, build output, config files, test
fixtures, and framework boilerplate.
Return ONLY a JSON array of folder paths to analyze.

Example: ["src/main", "app/components"]
If all source files are in the root, return ["."]

File tree:
{treeText}
The code node builds this prompt dynamically from the fetched tree and passes it to the next LLM call:
const parseUrl = $('Code: Parse Input').first().json;
const treeResp = $input.first().json;

const branch = treeResp.url?.includes('/main?') ? 'main' : 'master';

const filePaths = treeResp.tree
  .filter(item => item.type === 'blob')
  .map(item => item.path);

if (filePaths.length === 0) throw new Error('No files found in repository');

const treeText = filePaths.join('\n');

return [{
  json: {
    owner: parseUrl.owner,
    repo: parseUrl.repo,
    branch,
    repoUrl: parseUrl.repoUrl,
    assignmentPrompt: parseUrl.assignmentPrompt,
    treeText,
    filePaths,
    folderDetectionPrompt: `Given this project file tree, identify which folders contain actual source code written by a student. Exclude dependencies, build output, config files, test fixtures, and framework boilerplate.\nReturn ONLY a JSON array of folder paths to analyze.\n\nExample: ["src/main", "app/components"]\nIf all source files are in the root, return ["."]\n\nFile tree:\n${treeText}`
  }
}];
2c. Identify Source
This LLM call has one job: look at the file tree and return the folders worth evaluating. The system prompt locks it into a strict “project structure analyzer” role, and the output format is constrained to a raw JSON array — no markdown fences, no explanation.
You are a project structure analyzer. Given a file tree, identify folders containing student-written source code. Return ONLY a valid JSON array of folder path strings. No explanation, no markdown fences.
The output — something like ["src", "lib/utils"] — feeds directly into the next node, which filters the full file list down to just the files inside those folders.
3. Fetch Files
3a. Filter Source Files
The filter node takes the LLM’s folder list and cross-references it against every file path from the tree. Only files inside identified source folders survive. There’s a fallback built in: if the LLM response is malformed or unparseable, it defaults to ["."] — which means “everything in the root.” Better to evaluate too much than silently skip the whole repo.
In N8N you can eventually define fallback workflow that run in case of error. You can instruct it to report the error instead of just missing the response.
If zero files match after filtering, the workflow short-circuits with a NO_SOURCE_FILES error instead of burning tokens on an empty evaluation.
const prev = $('Code: Process Tree').first().json;
const folderResp = $('LLM: Identify Source Folders').first().json;

let sourceFolders = ['.'];
try {
  let folderText = folderResp.text || folderResp.response || JSON.stringify(folderResp);
  folderText = folderText.replace(/```json\n?/g, '').replace(/```/g, '').trim();
  sourceFolders = JSON.parse(folderText);
  if (!Array.isArray(sourceFolders)) sourceFolders = ['.'];
} catch (e) {
  sourceFolders = ['.'];
}

const isInSourceFolder = (path) => {
  if (sourceFolders.includes('.')) return true;
  return sourceFolders.some(f => path.startsWith(f + '/') || path === f);
};

const sourceFiles = prev.filePaths.filter(path => isInSourceFolder(path));

if (sourceFiles.length === 0)
  return [{
    json: {
      error: true,
      code: 'NO_SOURCE_FILES',
      message: 'No source files found in the identified source folders.'
    }
  }];

return sourceFiles.map(filePath => ({
  json: {
    owner: prev.owner,
    repo: prev.repo,
    branch: prev.branch,
    repoUrl: prev.repoUrl,
    assignmentPrompt: prev.assignmentPrompt,
    sourceFolders,
    filePath
  }
}));
3b. Get Files
Each filtered file gets downloaded individually via the GitHub Contents API. The node makes one HTTP GET per file, using the owner, repo, branch, and file path extracted earlier. N8N handles the parallel execution — each item from the filter step becomes its own request.
3c. Prepare Files
This is the safety valve. The node collects every downloaded file, prepends line numbers (used later for precise feedback references), detects the dominant language, and — critically — counts total lines across all files.
If the project exceeds 3,000 lines, the workflow stops with a PROJECT_TOO_LARGE error. This matters more than you’d think. When you’re automating calls to a third-party LLM that bills by token count, an unbounded input is a blank check. One student submitting a framework-generated project with 50,000 lines of scaffolding would cost more than your entire monthly budget. Always validate input size when you’re paying per token.
const items = $input.all();
const meta = $('Code: Filter Source Files').first().json;

if (meta.error) return [{ json: meta }];

const files = [];
for (let i = 0; i < items.length; i++) {
  const data = items[i].json;
  const filterItems = $('Code: Filter Source Files').all();
  const filePath = filterItems[i]?.json?.filePath || '';

  const content = typeof data === 'string' ? data : (data.data || data.body || '');
  if (!content) continue;

  const lines = content.split('\n');
  const ext = filePath.split('.').pop().toLowerCase();
  const numbered = lines.map((line, idx) =>
    `[${String(idx + 1).padStart(3, '0')}] ${line}`
  ).join('\n');

  files.push({
    filename: filePath,
    language: ext,
    totalLines: lines.length,
    numberedContent: numbered
  });
}

if (files.length === 0)
  return [{
    json: {
      error: true,
      code: 'NO_SOURCE_FILES',
      message: 'Could not fetch any source files from the repository.'
    }
  }];

const totalLines = files.reduce((sum, f) => sum + f.totalLines, 0);

if (totalLines > 3000)
  return [{
    json: {
      error: true,
      code: 'PROJECT_TOO_LARGE',
      message: `Project has ${totalLines} lines (max 3000). Reduce the project size.`
    }
  }];

const langCounts = {};
files.forEach(f => { langCounts[f.language] = (langCounts[f.language] || 0) + f.totalLines; });
const dominantLanguage = Object.entries(langCounts).sort((a, b) => b[1] - a[1])[0][0];

return [{
  json: {
    totalLines,
    language: dominantLanguage,
    fileCount: files.length,
    files,
    owner: meta.owner,
    repo: meta.repo,
    branch: meta.branch,
    repoUrl: meta.repoUrl,
    assignmentPrompt: meta.assignmentPrompt
  }
}];
4. Evaluate
4a. Build Prompt
This node assembles the final evaluation prompt from moving parts. The core is always 3 metrics — naming, structure, and logic. But when the teacher provides an exercise description, a 4th metric (completeness) activates automatically. The code from the previous section handles the conditional logic, building assignmentContext and completenessMetric blocks only when exerciseDescription is present.
The user message concatenates every source file with its line numbers, so the LLM can reference exact lines in its feedback. The assignment context — either “infer intent from the code” or the actual exercise spec — gets appended at the end.
const data = $input.first().json;
if (data.error) return [{ json: data }];

const hasDescription = !!(data.assignmentPrompt && data.assignmentPrompt.trim());
const metricCount = hasDescription ? 4 : 3;

// Assignment context
let assignmentContext = `\n=== ASSIGNMENT CONTEXT ===\nNo assignment description was provided. Infer the student's intent from the code itself.`;
if (hasDescription)
  assignmentContext = `\n=== ASSIGNMENT CONTEXT ===\nThe student was given the following assignment:\n\n"""\n${data.assignmentPrompt}\n"""\n\nUse this to evaluate the "completeness" metric. Compare what was asked to what was built.`;

// Completeness metric block (only when description provided)
let completenessMetric = '';
if (hasDescription)
  completenessMetric = `\n\n--- METRIC 4: completeness ---\nFull name: Assignment Completeness\nThis metric measures what percentage of the assignment the code addresses.\n\nHow to calculate:\n- List every discrete requirement from the assignment.\n- For each: fully addressed (full weight), partially (half), or missing (0).\n- Convert the percentage to a 0-10 score (e.g., 73% = 7, 85% = 9).\n- In the comment, list each requirement as complete / partial / missing.`;


// Output rules
const outputRulesBlock = hasDescription
  ? `- One entry per file, all 4 metrics evaluated per file.\n- 0-4 suggestions per metric. At least 1 positive per file across all metrics.\n- Suggestion types: improvement, positive, concern.\n- project_metrics provides holistic scores across ALL files.`
  : `- One entry per file, all 3 metrics evaluated per file.\n- 0-4 suggestions per metric. At least 1 positive per file across all metrics.\n- Suggestion types: improvement, positive, concern.\n- project_metrics provides holistic scores across ALL files.`;

// File listing
const fileBlocks = data.files.map(f =>
  `=== FILE: ${f.filename} (${f.totalLines} lines, ${f.language}) ===\n${f.numberedContent}`
).join('\n\n');

const userMessage = `Analyze the following project files. Each file has line numbers prepended in [NNN] format.\nReference these exact numbers in your suggestions.\n\n${fileBlocks}`;

return [{
  json: {
    ...data,
    metricCount,
    hasDescription,
    assignmentContext,
    completenessMetric,
    outputRulesBlock,
    userMessage
  }
}];
The Core LLM Call
This is the prompt that does the actual teaching. I’ll walk through what makes it work — and what breaks if you change it.
The opening line sets the persona: a patient, experienced mentor. Not a linter, not a grading robot. The LLM is told its purpose is to help the student think about code better. Every piece of feedback should teach a concept or challenge a misconception. This framing matters — without it, the model defaults to “here’s the fixed version,” which defeats the entire point.
The scoring rubric uses a 0-10 scale with explicit bands. Scores below 7 require specific issues. Scores above 8 require specific strengths. This prevents the LLM from handing out vague 7s across the board — which it absolutely will do without constraints.
The metrics are defined with concrete “what to look for” lists. Naming checks for purpose-driven variable names, consistent casing, readable booleans. Structure looks at decomposition, single responsibility, duplication. Logic evaluates control flow clarity, edge case awareness, dead code. And when an exercise description is provided (shown in square brackets throughout the prompt), a 4th metric — completeness — activates, comparing what was asked against what was built.
The feedback rules are where the pedagogical philosophy lives. Rule 1: teach the concept, never write corrected code. Rule 3: use questions to activate thinking. These two alone separate this from every “AI code review” tool that just rewrites your function. The line reference requirement (startLine~endLine format) forces the model to point at real code instead of giving generic advice.
The output format is locked to raw JSON — no markdown fences, no preamble. The structure is rigid: project summary, project-level metrics, per-file metrics with suggestions, and a forward-looking next steps block. Rigidity here is a feature. The downstream rendering depends on predictable keys and types.
The parts in square brackets below are the conditional sections — they only appear when the teacher submits an exercise description alongside the repo URL. The code in the Build Prompt node handles this assembly automatically.
You are a patient, experienced programming mentor reviewing code written by someone learning to program.

Your purpose is to help them understand how to think about code better. Every piece of feedback should teach a concept or challenge a misconception. You are reading the code, not executing it.

=== SCORING ===

Rate each metric on a 0-10 scale based purely on code quality:
- 0-2: Severe issues throughout
- 3-4: Significant problems, below acceptable
- 5-6: Acceptable with notable gaps
- 7-8: Good, meets reasonable standards
- 9-10: Excellent, demonstrates strong skill

Every score below 7 must reference specific issues. Every score 8+ must acknowledge specific strengths.

=== METRICS ===

You evaluate code across exactly 3 metrics.
[You evaluate code across exactly 4 metrics.]

--- METRIC 1: naming ---
Full name: Naming & Expressiveness
What to look for:
- Variables named for their purpose, not their type or position
- Function/method names that are verbs describing behavior
- Consistent casing matching language conventions
- No cryptic abbreviations
- Boolean variables that read as true/false propositions
- Constants that describe their meaning

--- METRIC 2: structure ---
Full name: Structure & Decomposition
What to look for:
- Is the code broken into functions/methods or one monolithic block?
- Does each function have a single, clear responsibility?
- Are functions a reasonable length?
- Is there visible code duplication?
- Are parameters used to make functions flexible?

--- METRIC 3: logic ---
Full name: Logic & Control Flow
What to look for:
- Are conditionals clear and not unnecessarily nested?
- Are loop constructs appropriate?
- Are there unreachable code paths or dead branches?
- Are boolean expressions simplified?
- Does the student show awareness of edge cases?

[
	--- METRIC 4: completeness ---
	Full name: Assignment Completeness
	This metric measures what percentage of the assignment the code addresses.

	How to calculate:
	- List every discrete requirement from the assignment.
	- For each: fully addressed (full weight), partially (half), or missing (0).
	- Convert the percentage to a 0-10 score (e.g., 73% = 7, 85% = 9).
	- In the comment, list each requirement as complete / partial / missing.
]

=== FEEDBACK RULES ===

1. TEACH THE CONCEPT, NOT THE FIX. Never write corrected code.
2. EXPLAIN WHY, ALWAYS.
3. USE QUESTIONS TO ACTIVATE THINKING.
4. Maximum 4 suggestions per metric per file.
5. At least 1 positive suggestion per file.
6. Feedback is about the code, never the student.
7. LINE REFERENCES MUST BE EXACT using startLine~endLine format.

=== NEXT STEPS ===
After evaluations, produce a "next_steps" block (3-5 sentences):
- Identify the ONE highest-impact habit to build
- Add 1-2 supporting practices from the review
- Include one concrete complexity-management technique
- Keep tone encouraging and forward-looking

=== OUTPUT FORMAT ===

Return ONLY a valid JSON object. No markdown code fences. Begin with { and end with }.

```json
{
    "project_summary": "<2-3 sentences covering the entire project>",
    "project_metrics": [
        {
            "comment": "<Overall assessment across all files>",
            "name": "<metric key>",
            "score": <integer 0 to 10>
        }
    ],
    "files": [
        {
            "file": "<filename>",
            "metrics": [
                {
                    "comment": "<2-3 sentences assessing this metric>",
                    "name": "<metric key>",
                    "score": <integer 0 to 10>,
                    "suggestions": [
                        {
                            "lines": "<startLine~endLine>",
                            "message": "<feedback>",
                            "type": "<improvement|positive|concern>"
                        }
                    ]
                }
            ],
            "summary": "<2-3 sentences to the student>"
        }
    ],
    "next_steps": "<3-5 sentences>"
}
```

Rules for the JSON:
- One entry per file, all 3 metrics evaluated per file.
- 0-4 suggestions per metric. At least 1 positive per file across all metrics.
- Suggestion types: improvement, positive, concern.
- project_metrics provides holistic scores across ALL files.


=== ASSIGNMENT CONTEXT ===
No assignment description was provided. Infer the student's intent from the code itself.

[
	=== ASSIGNMENT CONTEXT ===
	The student was given the following assignment:

	"""
	{ex-description}
	"""

	Use this to evaluate the "completeness" metric. Compare what was asked to what was built.
]
5. Get Response
5a. Validate & Pack
The LLM returns text that should be JSON. Should. In practice, models sometimes wrap it in markdown fences, prepend a sentence of explanation, or produce subtly invalid syntax. This node handles all of that.
First, it strips any markdown code fences and isolates the JSON object between the first { and last }. Then it attempts to parse. If parsing fails, the workflow returns an ANALYSIS_FAILED error with the parse message — useful for debugging prompts.
All scores get clamped to the 0-10 range. LLMs occasionally hallucinate a score of 11 or -1 — clamping is cheap insurance. After validation, the node computes an overall_score by averaging all project-level metric scores, rounds to one decimal place, and prepends it to the response object.
The result is a clean, predictable JSON payload ready for either direct rendering or further transformation.
// ─────────────────────────────────────────────
// Parses the LLM JSON response, clamps scores
// to 0-10, computes overall score, packs response.
// ─────────────────────────────────────────────

const input = $input.first().json;
if (input.error) return [{ json: input }];

let rawText = input.text || input.response || '';

// Strip markdown fences and extract JSON object
rawText = rawText.replace(/```json\n?/gi, '').replace(/```/g, '').trim();
const firstBrace = rawText.indexOf('{');
const lastBrace = rawText.lastIndexOf('}');
if (firstBrace !== -1 && lastBrace > firstBrace) {
  rawText = rawText.substring(firstBrace, lastBrace + 1);
}

let parsed;
try {
  parsed = JSON.parse(rawText);
} catch (e) {
  return [{
    json: {
      error: true,
      code: 'ANALYSIS_FAILED',
      message: `Failed to parse AI response: ${e.message}`
    }
  }];
}

// Clamp all scores to 0-10
const clamp = (v) => Math.max(0, Math.min(10, Math.round(v)));

if (parsed.project_metrics) {
  for (const m of parsed.project_metrics) {
    if (typeof m.score === 'number') m.score = clamp(m.score);
  }
}

if (parsed.files) {
  for (const file of parsed.files) {
    if (!file.metrics) continue;
    for (const m of file.metrics) {
      if (typeof m.score === 'number') m.score = clamp(m.score);
    }
  }
}

// Overall score = average of project_metrics
let overallScore = 0;
if (parsed.project_metrics?.length) {
  const scores = parsed.project_metrics
    .filter(m => typeof m.score === 'number')
    .map(m => m.score);
  if (scores.length) {
    overallScore = Math.round((scores.reduce((a, b) => a + b, 0) / scores.length) * 10) / 10;
  }
}

return [{ json: { overall_score: overallScore, ...parsed } }];
5b. Send Data Back
The final node sends the packed JSON back as the webhook response. The caller gets the full evaluation in a single HTTP response — scores, per-file feedback, suggestions, next steps, everything.
You can test the whole pipeline with a single curl call:
curl -X POST http://{your-domain}/webhook-test/codegrader \
	--max-time 600 \
	-H "Content-Type: application/json" \
	-d '{"repoUrl": "{github-repo-url}", "exerciseDescription": "{optional-ex-description}"}' \
	| jq
N8N has 2 separate environment controlled by 2 separated starting URL:
-
test env: to make this running, you have to actively click on red button in N8N page for each execution, this prevent accidental run or forgotten open workflow Test URL
http://{your-domain}/webhook-test/{call-name} -
Prod env: this runs once workflow is published and require not further manual interaction for production state Prod URL
http://{your-domain}/webhook/{call-name}
The --max-time 600 flag is important — the full workflow (tree fetch, folder detection, file downloads, evaluation) can take 30-90 seconds (or even more!) depending on project size and LLM response time. Without it, curl will time out before the analysis finishes. Pipe to jq for readable output.
Keep in mind if you lost an output, N8N is everything within the dashboard. Just open execution tab and copy lost data from there.
5c. Result Template
The JSON response follows a fixed structure. Here’s the full template with placeholder values:
[
  {
    "overall_score": 10,
    "project_summary": "",
    "project_metrics": [
      {
        "name": "naming",
        "score": 10,
        "comment": ""
      },
      {
        "name": "structure",
        "score": 10,
        "comment": ""
      },
      {
        "name": "logic",
        "score": 10,
        "comment": ""
      },
      {
        "name": "completeness",
        "score": 10,
        "comment": ""
      }
    ],
    "files": [
      {
        "file": "",
        "metrics": [
          {
            "name": "naming",
            "score": 10,
            "comment": "",
            "suggestions": [
              {
                "lines": "",
                "message": "",
                "type": "improvement"
              }
            ]
          },
          {
            "name": "structure",
            "score": 10,
            "comment": "",
            "suggestions": [
              {
                "lines": "",
                "message": "",
                "type": "positive"
              }
            ]
          },
          {
            "name": "logic",
            "score": 10,
            "comment": "",
            "suggestions": []
          },
          {
            "comment": "",
            "name": "completeness",
            "score": 10,
            "suggestions": []
          }
        ],
        "summary": ""
      }
    ]
  }
]
The simplest way to render this: load it into any JavaScript frontend with fetch(), iterate over files, and for each file display the metric scores and map the suggestions array into styled blocks — color-coded by type (green for positive, yellow for improvement, red for concern). A single HTML file with vanilla JS can handle it. No framework needed, no build step.
6. [BONUS NODE] Markdown Transformation
JSON is great for structured rendering, but sometimes you just want a document. This optional bonus node feeds the evaluation JSON back into the LLM and asks it to produce clean, GitHub-compatible Markdown. The output works in Obsidian, renders on GitHub, and looks decent in any Markdown previewer.
You could be tempted to output a markdown in the first place, avoiding an LLM call. While this is possible, I noticed it leads to a more vague response and it's way harder to avoid small hallucinations. So to get better result I suggest you to stay sticky to the original plan.
It’s a second LLM call, so it adds a few cents per run — but the convenience is worth it when you want to share feedback quickly without building a frontend (you don’t actually need expensive model for this call, BTW)
6a. Build MD Prompt
The transformation prompt is direct: take this JSON, produce this exact Markdown structure. It specifies section order (overall score heading, project summary, metrics, per-file breakdowns, next steps), formatting rules (bold scores, inline code for line references, emoji prefixes for suggestion types), and constraints (plain GitHub Markdown only, no HTML).
Convert the following code review JSON into a clean GitHub-compatible Markdown document.

Follow this exact section order:
1. Heading with overall score (format: "# Code Review: X.X / 10")
2. Project summary as a paragraph
3. "## Project Metrics" — each metric as "### Metric Name" with score (bold) and comment
4. For each file "## filename":
   - File summary
   - For each metric "### Metric Name" with score, comment
   - Each suggestion as a bullet with type prefix (positive, improvement, concern), the referenced lines as an inline code block, and the feedback message
5. "## Next Steps" section at the end

Rules:
- Use plain GitHub Markdown only, no HTML
- Keep it concise and readable
- Scores in bold (e.g. **7/10**)
- Code line references as inline code

JSON:
${JSON.stringify(data, null, 2)}
6b. Generate Markdown & Pack Output
The LLM returns the Markdown as plain text. The node appends it to the existing JSON response as a markdown attribute — so the original structured data stays intact and the rendered document rides alongside it. This will grant you less AI mistake and you can still easily parse values to aggregate data. One response, two formats, endless value.
[
  {
    "overall_score": 10,
    "project_summary": "",
    "markdown": "# Code Review: 6.5 / 10\n\nThis project fetches..."
  }
]
The caller can use whichever format fits their workflow. Parse the JSON for a dashboard, extract the markdown field for Obsidian, or pipe it to a file and push to a GitHub repo.
Real World Example
Test Exercise
Here’s a simple assignment to test the pipeline end to end. The student needs to fetch data from a public REST API and do basic filtering and display:
Assignment: Using https://jsonplaceholder.typicode.com/todos, fetch the full list of todo items. Filter to find only items where completed is false, then display the titles of the first 5 incomplete items on the page.
The API returns an array of objects like:
[
  {
    "userId": 1,
    "id": 1,
    "title": "delectus aut autem",
    "completed": false
  },
  {
    "userId": 1,
    "id": 2,
    "title": "quis ut nam facilis et officia qui",
    "completed": true
  },
  {
    "userId": 1,
    "id": 3,
    "title": "fugiat veniam minus",
    "completed": false
  }
]
Two files, minimal scope — perfect for a grading dry run.
Test Execution
Here’s what a student might submit. I’ve seeded it with the kind of mistakes you see constantly in beginner code — vague variable names, missing error handling, everything crammed into one function.
index.html
<!DOCTYPE html>
<html>
<head>
    <title>Todo App</title>
</head>
<body>
    <h1>Todos</h1>
    <div id="output"></div>
    <script src="script.js"></script>
</body>
</html>
script.js
// get data and show it
var x = "https://jsonplaceholder.typicode.com/todos";

fetch(x)
  .then(function(r) {
    return r.json();
  })
  .then(function(data) {
    var arr = [];
    for (var i = 0; i < data.length; i++) {
      if (data[i].completed == false) {
        arr.push(data[i].title);
      }
    }

    var html = "";
    for (var j = 0; j < 5; j++) {
      html = html + "<p>" + arr[j] + "</p>";
    }

    document.getElementById("output").innerHTML = html;
  });
The code works — but look at what the reviewer should catch: x as a URL variable name, r for the response, loose equality with == instead of ===, no .catch() on the fetch, the second loop doesn’t guard against arr having fewer than 5 elements, and the whole thing lives in a single chain with no function decomposition. Exactly the kind of code where a teaching-oriented review shines over a linter.
graduation
You can check final result at this repository, or read following output:
Code Review: 5.3 / 10
The student has built a working solution that fetches todo data, filters incomplete items, and displays the first five on the page. The core logic is correct, but the code leans heavily on terse, type-based naming and lacks structural decomposition. There are also a few subtle robustness issues worth addressing as the student grows.
Project Metrics
naming
3/10
Variable names like x, r, arr, and j describe position or type rather than purpose. The one comment on line 1 is vague and doesn’t add meaning beyond what the code already implies. Adopting intention-revealing names is the single biggest readability upgrade available here.
structure
3/10
All logic lives inside a single chained .then callback with no decomposition. Fetching, filtering, slicing, rendering — these are four distinct responsibilities that could each be a named function. Keeping everything inline makes it harder to test, reuse, or read any one part in isolation.
logic
5/10
The filtering and rendering loops are logically correct for the happy path. However, the loose equality check == false instead of === false is a subtle hazard, and there is no guard if fewer than 5 incomplete items exist — the loop on line 17 would silently render undefined into the page. Edge cases are not considered.
completeness
10/10
All three assignment requirements are addressed: fetch from the correct URL (complete), filter where completed is false (complete), display the first 5 incomplete titles on the page (complete). Full marks for coverage.
index.html
The HTML file is clean and correctly structured. The main opportunity here is choosing a more descriptive element ID. As a general rule, an ID should answer ‘what lives here?’ for anyone who hasn’t read the JavaScript.
naming
6/10
The HTML element IDs and tags are semantically reasonable. output as an ID is a little generic — something like todo-list would communicate intent — but this is a minor issue in a small file.
⚠️
8~8: The idoutputdescribes a role (something outputs here) rather than a domain concept. What is actually being output? A name liketodo-listorincomplete-todoswould tell a future reader what to expect inside this element without needing to read the JavaScript.
structure
8/10
The HTML structure is clean and minimal — a <div> target for JavaScript output and a script tag at the bottom of the body, which is the correct loading order. Nothing is over-engineered.
✅
9~9: Placing the<script>tag just before</body>is exactly right — it ensures the DOM is ready before the script runs. This is a solid habit to keep.
logic
8/10
No logic lives in the HTML, which is appropriate. The file does its one job — structure — correctly.
completeness
10/10
The HTML provides the required output container and script reference. Fully supports the assignment.
script.js
The logic works and the assignment is complete — that matters. The next growth area is naming: every variable name here describes a container rather than its contents, which forces a reader to trace the code to understand it. Start with renaming x, r, arr, and the callback parameters, then consider how extracting named functions for filtering and rendering would make the overall flow self-documenting.
naming
2/10
Every name in this file describes shape or position rather than meaning: x is a URL, r is a response, arr is a list of incomplete titles, j is a loop index into that list. A reader has to mentally execute the code to understand what each variable holds.
⚠️
2~2:xtells us nothing about what it stores. What is this string? It’s the endpoint URL for todos. A name likeTODOS_API_URLortodosUrlcommunicates that immediately. Constants in JavaScript are often written inUPPER_SNAKE_CASEto signal they won’t change.⚠️
5~5:ris the HTTP response object. Naming the parameterresponsecosts nothing and makes the callback’s intent obvious. The same applies todataon line 8 —todoswould be more precise since that’s exactly what the API returns.⚠️
9~9:arrdescribes the data structure, not the content. What is in this array? Titles of incomplete todos. A name likeincompleteTitlesmakes the filtering logic on line 12 much easier to follow without needing to trace where it’s built.⚠️
1~1: The comment ‘get data and show it’ summarizes the entire file without adding insight. Comments are most useful when they explain why something is done a certain way, not what is happening — the code itself should show what. Consider whether this comment earns its place.
structure
3/10
All logic — fetching, filtering, slicing, and rendering — is collapsed into a single .then callback. There is no decomposition into named functions. Each of those four steps is a distinct responsibility that could be extracted and named, making the code easier to read, test, and reuse independently.
⚠️
9~14: The filtering loop is doing a specific, reusable job: extract titles from incomplete todos. What would it look like if this were a function calledgetIncompleteTitles(todos)? That function could be tested on its own and reused elsewhere. Think about whether each block of logic could be named and extracted.⚠️
16~21: The rendering block (lines 16–21) is another self-contained responsibility: take a list of titles and display them. If this were a function calledrenderTitles(titles), the top-level.thenwould read almost like a plain-English description of the program’s steps. How would that change the readability of the overall flow?🔴
4~22: Thefetchcall and its chain handle everything from network request to DOM update with no error handling. What happens if the network request fails?.catchcan be chained after.thento handle that case — leaving it out means errors fail silently.
logic
5/10
The core logic correctly filters and renders, which shows solid understanding of the problem. However, the loose equality == false and the unguarded loop index introduce subtle bugs that could surface with real data.
⚠️
11~11:== falseuses loose equality, which means JavaScript will coerce types before comparing. For instance,0 == falseistrue. Sincecompletedis always a boolean in this API, it works here — but using=== falsemakes the type expectation explicit and avoids surprises if the data ever changes. Alternatively,!data[i].completedis idiomatic JavaScript for this check. Why might being explicit about types matter as programs grow?🔴
17~19: The loop on line 17 always runs exactly 5 times regardless of how many items are inarr. Ifarrhas fewer than 5 entries (which is possible — imagine an API returning only 3 incomplete items),arr[j]will beundefinedand you’ll render<p>undefined</p>into the page. What condition could you add to the loop, or what array method could replace the loop entirely, to protect against this?
completeness
10/10
All three requirements are met: the correct URL is fetched, items are filtered by completed === false, and the first 5 titles are displayed. The assignment is fully addressed.
✅
4~22: The solution correctly hits all three requirements from the assignment spec. The pipeline from fetch → filter → slice → render maps directly to what was asked. This is a strong foundation to refactor from.
Next Steps
The highest-impact habit to build right now is intention-revealing naming — before writing a variable or function, ask ‘what does this represent in the problem domain?’ rather than ‘what type or shape is it?’ Supporting that, practice decomposing even small programs into named functions where each function has one clearly stated job; this file would benefit from at least three: one to fetch, one to filter, one to render. To manage edge cases, get in the habit of asking ‘what happens if this list is shorter than I expect?’ before finalizing any loop — JavaScript’s Array.prototype.slice(0, 5) is one tool that handles both normal and short arrays gracefully. These habits compound quickly and will make your code readable to others — and to your future self.
Test For Free
There’s a limited number of spots available right now to test the full workflow on an already-running instance — no setup required. Submit a public GitHub repo URL and get back a scored, line-by-line evaluation: codegrader.wows.dev/beta
If you just want to check result on this test repository, this is the link: codegrader.wows.dev/beta/460aa5c6-e8f1-4a97-be0f-f502eadfec3a/result
What This Costs
The infrastructure cost breaks down into two parts.
N8N ranges from free to 20/month starter plan covers up to 2,500 executions — enough for most individual teachers. Heavier usage or team setups push into higher tiers and/or more complex workflow.
Tokens depend on project size and model choice. Simple execution on small or medium student project, can range from fraction to few cents, while more complex project and top-notch models can easily skyrocket up to a dollar or more per execution. Given that, I noticed you have to provide a quite complex project (like a final grade exam or something actually in production) to be able to notice difference from medium tier model (let’s say Sonnet 4.6) to the top ones (let’s say Opus 4.6). Make sure you’re using a very cheap model for trivial execution like file shaking and json-to-md translation and you should have a pretty decent executions at a very reasonable price.
What’s Next
This article covers the core engine — submit a repo, get a structured review. But it’s designed as the inner loop of something bigger.
The next step is wrapping this in an automated pipeline: GitHub webhooks that trigger reviews on every push, scheduled batch evaluations across an entire class roster, and a hosted dashboard where students check their feedback through a shareable link. Instead of a teacher manually submitting repos one at a time, the system ingests repositories on its own and publishes reports on a schedule.
The evaluation workflow stays exactly the same. What changes is the plumbing around it — how repos get in, how reports get out, and how they’re shared.
The Point
The AI code review tools that already exist are built for professional developers. They catch bugs, suggest refactors, and auto-fix style violations. That’s useful in production. It’s useless in education.
A student who gets handed the corrected version of their code learns nothing except how to copy-paste. The whole point of this workflow is the opposite: score the code, point at specific lines, and ask questions that make the student figure out the fix themselves. The LLM never writes corrected code. It teaches concepts, explains why something matters, and challenges the student to think harder.
I built this because I needed it — for real students, in a real class. And it turns out the hard part isn’t the AI. It’s designing the prompt so the feedback actually teaches instead of just performing intelligence.